
How To Use the Philmont Trail Guide
Main Navigation
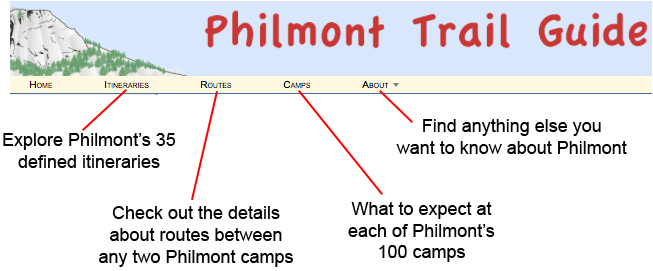
Itineraries
A Philmont itinerary is the outline for your trek – it defines the 12 camps you stay at during each of your 12 nights at the Ranch. How you get between the camps is largely up to you, but you must be in your assigned camp each night.
From the Itineraries menu item in the top navigation bar, you reach a list of all 35 itineraries. Going to any of the individual itineraries gives you several views of that itinerary. Common to each view is the blue sidebar on the left showing a brief summary of the itinerary including distance, elevation gain and loss, layovers, and highlights.
Itinerary: Overview
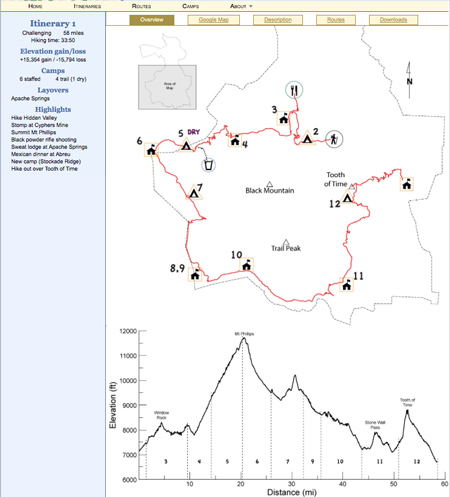
The initial page is the Overview ("Overview is highlighted in light text on a dark background below the main navigation bar) - an example is shown to the right. It shows an outline map of the itinerary at the top of the page and an elevation profile graph below that. You may need to scroll down to see the elevation profile depending on your screen settings.
The map shows the recommended route in red; side hikes or optional routes are shown as black dotted lines. An outline of the ranch and a few key geographic features (like Black Mountain, the Tooth of Time, etc) provide you with general reference points.
Each night's camp is numbered with the day of the trek you hike there. The symbols for the camp tell you if it's staffed (a building with an orange square) or unstaffed (a teepee with an orange triangle). Waterless camps are marked with a purple label ("DRY"). A water glass symbol with a blue circle shows nearby water.In the example to the right, the camp ending your 5th day at Philmont (in this case, Mt Phillips Camp) is dry; water is available to the southeast (in this case, Red Hills Camp).
A black-circled figure of a hiker shows a trailhead – where you start or end you itinerary with a bus ride. A green circle shows where you pick up food - it's either around a knife and fork symbol for food pickups on the way to another camp, or around the camp symbol if you're picking up food at the same camp you're staying overnight.
The elevation profile graph shows you altitude versus distance along your trek. Each day of travel is numbered (between the distance axis and the graph line) and separated by vertical dashed lines. Very short days (like day 2 for most itineraries) may not be numbered; layover days are not numbered if there is no side hike suggested.
Itinerary: Google Map
The second tab, labeled “Google Map”, shows you the itinerary plotted on a Google map topographic view. All of the typical Google map controls work as expected.You can zoom in and out using the slider control in the upper left corner of the map or by scrolling your mouse wheel. (NOTE: if you want to scroll up and down the page rather than zoom the map, move your mouse pointer off the Google map.) You can move the map around by clicking and dragging. Switch between topographic and satellite maps with the buttons on the top right of the map. The Google map lets you see the actual terrain the itinerary covers in as much detail as you wish. Superimposed on the map is an outline of Philmont for reference.
Itinerary: Description
The third tab, Description, shows a table with each day's hike. The brown heading for each entry shows your destination camp (clicking the heading takes you to a page about that camp). The row for each day also has a description of the recommended route, distance, elevation gain and loss, and estimated hiking time.
Itinerary: Routes
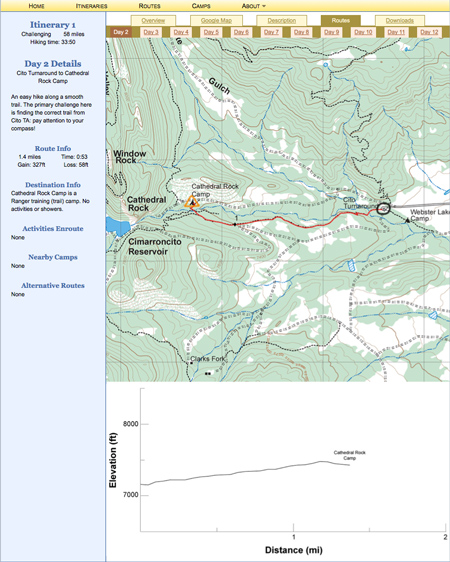
The Routes tab for the itinerary (as opposed to the Routes menu item on the top navigation bar) jumps to information about the recommended route for day 2 of your itinerary (the first hiking day) – and the new set of tabs below the itinerary view tabs allows you to select days 3 through 12. See the example to the right.
Each day shows some route specific information on the blue sidebar including distance, estimated hiking time, and elevation gain and loss. Destination information tells you what activities are available at the destination camp. If there are staffed camps within a mile of your destination, they, and the activities available at them, are listed as nearby camps. Finally, if there are staffed camps or other points of interest along the route, they're listed with their activities under activities enroute.
The topographic map shows the route as a solid red line with a small black diamond every mile for reference. Starting and ending camps are marked as on the overview map: an orange square for staffed camps and an orange triangle for trail camps. Dry camps are labelled in purple with "DRY". Food pickups are circled in green and water sources near dry camps are circled in blue. Alternate routes or side hikes, if any, are shown as a red dotted line.
Below the topographic map (you may have to scroll down depending on your screen settings), is a graph of the elevation profile for the recommended route.
You can get some more detailed information about the route by navigating to the Routes tab on the main navigation bar, then choosing the route based on starting camp from there. These detailed Route pages will include additional information about alternate routes (if any are possible), a more detailed description of the hike, and more data on elevations. They will also let you zoom in on the Google map of that specific route.
Itinerary: Downloads
The final tab, Downloads, provides links to downloadable files: GPS waypoints and printable PDFs to take on the trail.
Routes
The Routes choice on the main navigation bar takes you to a dictionary-like page linking you to every route at Philmont. The routes are organized based on starting camp. For example, if you want more information about the route between Cimarroncito and Cyphers Mine, navigate to the “C”s, then select Cimmaroncito to Cyphers Mine. For some itineraries, you are required to travel by a “non-optimal” route. For example, day 3 of itinerary 1 requires you go from Cathedral Rock Camp to Cimarroncito with a stop at Ute Gulch to pick up food. That route is listed as Cathedral Rock to Cimarroncito via Ute Gulch.
Once you choose a route, you'll be linked to a page with details about the route (on the blue sidebar to the left) and a topographic map of the recommended (and alternatives) route on the right. Like the itineraries pages, this page also has tabs across the top that allow you to also view a Google map or an elevation profile for the recommended route. The routes pages provide additional details for the recommended routes including high and low points and which itineraries share the route.
Camps
Details about Philmont's nearly 100 staffed and unstaffed camps can be accessed through the Camps choice on the main navigation menu. A dictionary-like page from the main menu will take you to information on the camp of your choice. Information includes activities available at the camp and other camps within about a mile (and the activities available).
About
If you want to find out more about how the maps and GPS downloads were made or where to find other information about Philmont (such as packing lists or training tips), check out the About choice on the main menu.